Tuesday, July 16, 2013

Wedding Coordinator Noob


My day job consists of Marketing, Event Coordinating, PR and Project Management, so I decided to put my organizational skills to use to start an event planning business.
Late last year, I was giving one of my good friends some ideas for wedding invitations and décor. I also ended up giving her a copy of a spreadsheet I created to help her budget and keep track of her expenses for the wedding. She ended up making me her Day of Wedding Coordinator, and that’s how this business became a reality. Here's my beautiful bride and groom:
Since this was a good friend of mine, I tried to also help her along the way, not just on the day of. I created the templates below for her to fill out to help the day go smoothly:
·         Timeline – Based on a traditional wedding I gave her time suggestions of events (makeup, ceremony, pictures, speeches, cake cutting, etc). I created a separate timeline for her wedding party and a vendor one so I knew when she wanted me to meet with vendors, provide payment, etc.
·         Checklist – list of things to bring and where they would be
·         List of Vendors & Contact Info
·         List of Bridal Party
·         I also asked her for : Any special requests/notes, diagram/picture of how she wanted décor set up

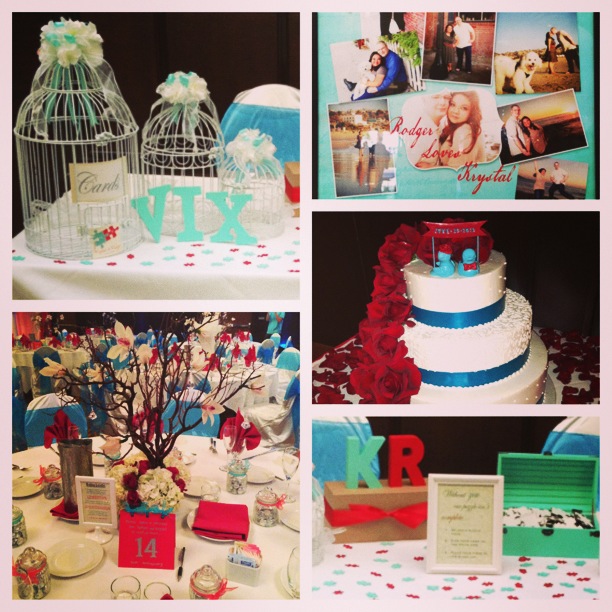
Here's a glimpse into her wedding and the decor I set up. It was a puzzle theme because they "found their missing piece"


On the day of the wedding, below were my main responsibilities:
·         Line-Up Wedding Party and give Flowers/Boutonnieres for Ceremony
·         Set up Décor: Welcome Table, Seating Chart, Guest Dinner Tables, Kids Activity Table, Dessert Table
·         Set up Food for Wedding Party
·         Meet with each vendor and call them to make sure they are on time.
·         Give meals and final payments and gratuities to each vendor
·         Work with Venue Coordinator to make sure everything in place, lighting is good, and be point of contact if any issues arise
·         Line-Up Wedding Party for Grand Entrance
·         Give cues to DJ for events and make sure everything running on time
·         Put Away Welcome Table Décor towards end of night
·         And most importantly… Make sure Bride & Groom are relaxed and have a great time!

For the most part I felt everything went smoothly. My bride was very happy with my work and so were the vendors that I worked with. Being on the other side of the wedding, I knew it was important to build a rapport with each vendor, so I tried to make sure that I took a few minutes to talk to each one and make sure they had everything they needed throughout the night and to use me as a resource if they had any questions or needed anything. When I had down time I brought drinks to my bride and groom and the wedding party too because I wanted to make sure they had a good time. It was also important to me to make sure the parents of the couple had everything they needed throughout the night, because this day is for them too. Many of the vendors asked me for my card, so I guess I need to create one now. I’m officially for hire for your big day!  

Here's are a few pics from the day of the wedding. Since I was also a guest at the wedding in addition to being the wedding coordinator, I got to get dressed up as well. If I wasn't a guest, I would most likely be wearing all black. I was going for a "Great Gatsby" look. You know I'm savvy, and my dress was a steal and treasure find from Lohemann's for about $50. The beading makes it look so expensive, I loved it! I  also included a shot with my cousin who is a good friend of the bride, but also the Hotel Venue Coordinator who helped me throughout the day as well.

Friday, July 5, 2013

Get Lifted - Upcycling Furniture Heights

First off, I apologize for not having blogged in awhile. I was super busy with work and coordinating my first wedding, which you'll hear about in my next post =)

Anyway, my last 2 pieces of furniture turned out to be too low to the ground so I needed to find a way to raise them up, but still keep it cohesive with the rest of my pieces, and stylish of course.

First off, I got this fabulous TV stand from www.vivedecor.com


I've seen this same Braxton Studio brand TV stand on sites like Amazon and Wayfair, but I found it for the best price on www.vivedecor.com for $250, shipped! Such a great deal, not even Ikea could give me something for this price at a comparable style. Anyway, I was stoked on the price, but of course with something that cheap, there's something bound to be wrong. When I got it, it was in a million pieces! With all cheap furniture, that's not really made of solid wood (mostly wood particle), you usually have to assemble it yourself and it doesn't come in one sturdy, ready-made piece, like the good old wood furniture pieces from back in the day. At first the assembly was going ok,, but when I went to drill in the very bottom piece, the holes weren't lining up and the directions didn't label some of the parts correctly. It took about 4 hours to put it together, and I ended up having to drill some of my own holes to make it fit. Thank goodness I'm a bit handy and knew that I could drill my own holes, because if you rely on directions, this would've been impossible! Anyway, I finally got it assembled and realized it was a bit too low for my  taste, especially since my sofa has 6" tapered legs which lifts it off the ground.


The solution? I found these mid-century style hairpin legs off of Furious Endeavors from Etsy . I worked with the shop owner Lou who was fabulous to work with! He made me a custom listing for 6" hairpin legs so they were lifted the same height as my sofa. I forgot I needed a leg for the very center of the TV stand to support the weight of the TV so it won't sag, so he is even making me a custom leg for that as well. His legs are the best price around and are already coated, while most other sellers sell these metal legs un-coated, which means they'll rust if you don't coat them yourselves.


The old legs were these cheap plastic silver squares that were about 1.5" high which I hated and were too low. I replaced them with the Furious Endeavors from Etsy metal hairpin legs. All you have to do is drill them with your own screws. I used 1.5" drywall screws and a basic drill. See the finished project below! I love how the legs made a super modern and plain TV stand into a mid-century style which i loved, and gave it the height I needed!


Now for my 2nd piece of furniture that needed some added height. You may remember my vanity below from a previous post. I ended up painting the frame grey, because I didn't like the contrast of brown and mint. I also ended up purchasing an Eames style Eiffel Chair like this at a furniture store for $40 because it was a floor model. That was such a steal in itself as this chair retails for about $100. The chair looked almost brand new, except for a few scuffs, all of which I removed with a Mr. Clean Eraser , which by the way is awesome for removing scuffs off walls, shoes, furniture, etc. Anyway, the chair barely fit under my vanity would scratch up against the lowest point, so I needed a way to raise the vanity.


My first thought was to get some circle wood pieces cut at Lowe's or Hope Depot to glue or drill to the bottom of the legs. Then it dawned on me! I remembered Michael's has a bunch of pre-made wood pieces so I took a trip there to see if I could find anything. I found these little wood pieces in the wood section for about $2.50 (with the Michael's 40% off coupons they always have). I knew the width and round, traditional style would go perfectly with the curved legs of my vintage vanity. I also got some E6000 glue, but you can use wood glue or drill them straight to the legs since these little wood pieces had a whole at the bottom and was hollow. I just worried since the legs were thin, that it might crack the wood, especially since it's a vintage piece, so I decided on the glue method for now.

I painted the wood pieces grey first to match the vanity, and then glued them on. Read the glue directions as this one requires 24 hours to dry. This type of glue is also a bit toxic, so make sure to have the windows open or apply in an open area.

I love how it turned out, and not my chair fits perfectly under, without touching the vanity. I feel like the addition goes perfectly with the existing style, and doesn't look like I added it. What do you think?


Even, Rambo approves!


Saturday, June 1, 2013

Project Vanity

I've been on the hunt for the perfect vanity for a couple months now. I wanted something vintage and classic that wouldn't go out of style, but still had some whimsy. Another important feature was that it needed to have storage for all my makeup and hair necessities. Lastly, and the hardest part, was that it needed to be 42 inches wide or less because it would be going into a niche 42" wide. Well low and behold, Craigslist brought me this beauty. It's actually a desk that I'll be repurposing as a vanity. I love the shape of the legs and all the drawers!


You probably can't tell from the picture, but the person who had this before put a cream wallpaper on each drawer. They were a bit beat up, so I decided I was going to paint it and change out the rusty knobs. Below are my supplies: Valspar mint green paint, foam brush and sandpaper. 


I haven't moved into my new place yet, but I was planning to have some mint green accents, so I thought I'd paint just the drawers green. I peeled off the wallpaper off of one drawer and I found that there was a keyhole that was covered. I painted it to see what it would look like, and the wood wasn't taking the paint well, plus I didn't like the extra hole. I wasn't sure how I was going to fix this. I thought about putting a sticker over the hole, but then i knew the shape of the sticker would show through the paint. Finally, I found some electrical tape and covered the entire drawer with it. If you have to do something like this, you have to line up the tape perfectly so that they don't overlap, otherwise you'll see the lines after you paint over it.


After my first drawer, I decided to just paint over the wallpaper, and it came out better than painting directly on the wood. I changed out the tarnished knobs for these cute crystal diamond shaped ones I found at Lowes.


Here's the finished product! I'm still not sure about the color. I'm going to have to see how it looks like with the rest of the room once I move into my new place. If it doesn't fit in with the rest of my decor, it's an easy fix with a new  color of paint. For now, I love the pop of color and how it turned out! Now I just need to find a chair or stool and a mirror to complete my perfect vanity.


Wednesday, May 22, 2013

Savvy or Steep Summer Sandals & Handbags

Now that summer is fast approaching, I thought I'd share some savvy versus steep sandals and handbags. FYI, I tried on all the Target Sandals and Flats and they are super comfy, especially the Sam & Libby ones. And in case you didn't know, the "Sam" in "Sam & Libby" is Sam Edelman, so you're getting the same great designer we love for a fraction of the price! Happy wallets and happy shopping!


Wednesday, May 8, 2013

Savory Discovery - Bear Flag Fish Company

I've been missing Hawaii lately. I used to go almost once a year because I have family there, but that stopped as I got older. The last time I went was in 2008. Anyway, missing Hawaii made me crave some fresh seafood. My go to spot for fresh poke is North Shore Poke Company in Huntington Beach and a friend recommended I try Bear Flag Fish Company in Newport Beach since I love poke. The restaurant is near the Newport Balboa Peninsula, in the same parking lot as Rudy's Pub & Grill. It's a small restaurant with some seating inside and a small patio. There was a small line when I went there, and I heard that's pretty normal, so be prepared for a little wait. Here's a shot of the outside and inside in case you're interested.


APPETIZERS:

  1. Clam Chowder - Don't want to overhype it, but this is the best Clam Chowder I've had in Southern California! Big pieces of clams and fish and not too salty, perfect!!
  2. Ahi & Salmon Poke - Huge chunks of fish. You can't see it well in the picture, but the bottom half is salmon and the top half is ahi. I've never had salmon poke, and so glad I finally have. Super fresh and flavorful
  3. Shrimp Cocktail - This was probably the only thing that wasn't impressive. Shrimps were big, but nothing special. I wanted to try the Crab Cocktail, but they ran out, so I'm guessing it's good.


MAIN COURSE

  • Seared Garlic Butter Ahi Tuna Plate - The ahi was seared perfectly and had a hint of garlic. I could have used a little more garlic and butter though. The brown rice and veggies were a perfect pairing to the fish and made me feel like I was eating healthy.
  • Albacore Burrito - Never had such a fresh tasting burrito! There was rice, avocado, black beans and fresh salsa as well and all complimented each other perfectly. The only thing I felt it lacked was a sauce, but they have tons of sauces there to add yourself. I went for this sweet chili sauce which gave it a little kick but had some sweetness to balance it out.
  • Halibut Burrito - Exactly like the Albacore but with Halibut. The halibut was a little mushy and I think would've tasted better if it was grilled with a stronger fire, to give it a little char and crunch, other than that detail, I still enjoyed it!


Everything was so delicious. It's hard to find fresh seafood that's cooked right, and the place definitely delivers! The location is great too because you can cruise around on your bike, or spend the day at the beach or Balboa Peninsula to work up an appetite. I highly recommend trying this place if you love seafood like I do. Oh and in case you're wondering, I shared all this food with two other people. There's no way I could have finished it all. I always try to go to new restaurants with at least 3-4 people so I can sample a variety of items on the menu.

Tuesday, May 7, 2013

Foodie & Art Day in LA

I've been meaning to check out the Stanley Kubrich exhibit at LACMA, so I decided to make a whole LA day out of it.

The day started off with brunch at Doughboy Cafe, just down the street from LACMA. I've had it bookmarked on Yelp for awhile, so was excited to try it out. I had the Almond Crusted French Roast with strawberries, and my date had the Breakfast Burrito. The french toast was delicious! It wasn't too sweet, and the almonds gave it a nice crunch and extra flavor. I was pleasantly surprised with the breakfast burrito as well. I kind of gave my date crap because I didn't think a burrito at a non-Mexican joint would be good, but it actually was! It had thick slabs of bacon, avocado, crunchy hashbrowns, fluffy eggs and salsa. We always share food and it definitely satisfied my sweet and savory cravings! Next time I want to try the red velvet pancakes or red velvet cake which they're famous for.

After filling our bellies, we headed to LACMA. We try to come every time there's a new exhibit. The last time we came was for the Tim Burton exhibit, which was amazing. The special exhibits are a little more pricey and this one, like the Tim Burton was $20. A little tip, if you want to see the regular exhibits you can actually check them out for free if you come after 3pm on a weekday. In case you don't know who Stanley Kubrick is here are a few of his movies you might recognize:
  • Clockwork Orange
  • Full Metal Jacket
  • Eyes Wide Shut
  • The Shining
  • Lolita
When you first enter the exhibit, there's a gallery wall of all Kubrick's movies. I recognized the ones listed above, but there were so many that I had never heard of as well. As I went through the exhibit I learned that Kubrick started his career as a photographer for Look Magazine. His photos were very unique in that they captured moments and emotions that most people wouldn't catch. He definitely had an eye for unique images and liked to push the envelope with his noir films. If you watch his movies today, you probably wouldn't think twice about the topics, but back when the movies were originally released, they were definitely controversial. The exhibit had props from his different movies and previews of his films, but it also included interesting pieces such as complaint letters from organizations such as churches who were offended by his movies.


I really enjoyed the exhibit because I learned so much more about Stanley Kubrick and got a glimpse into his thought process for his photographs and movies.Although I've seen the permanent collections already, I still like to do a quick walk through of the other galleries. Above are a few pictures from the Stanley Kubrick exhibit as well as some of the other installations. When you come to LACMA, you also have to take advantage of the awesome photo spots: the Urban Light, the neon yellow string installment, the LACMA Rock, and on top of the Broad Contemporary Art building overlooking LA.

To end our day, we had dinner at Mendocino Farms, down the street from the museum and across The Grove. It was another place I wanted to cross off my Yelp bookmarks. Right when we walked in we were greeted by the friendly staff. I loved the mix of industrial and reclaimed wood decor. Since the hubby and I indulged at Doughboy Cafe, we decided to split a Korobuta Pork Belly Banh Mi Sandwich. They also let you try all of the sides and we settled on half Almond Romesco Shells (has pasta, red pepper, parmesan and spinach) and the Curried Cous Cous (with carrots, artichoke and cauliflower). The sides itself were bomb.com! My favorite was the curried cous cous; who would've thought to mix the two? It was nothing like I've tasted before. It tasted a little bit like Indian Curry, but not spicy, great combo. The almond romesco shells was very light and fresh. Now to the main course. The pickled daikon, carrots, cilantro, cucumbers and jalapenos are all normal banh mi ingredients but the caramelized kurobuta pork and the chili aiolo on the panini grilled ciabatta was a pleasant twist that made my tastebuds sing in joy. Hubby and I agreed we are definitely coming back here. Next time we want to try the Steak BLT and Prosciutto and Free Range Chicken sandwiches.


Sunday, May 5, 2013

DIY Gold Bookshelf

I've been on the hunt for a gold bookshelf and haven't been able to find one under my budget of $100. Maybe because the color is associated with luxury, all gold furniture I've run into seems to be very pricey.... and you know what that means, a DIY project.

Instead of starting from scratch, I decided to do another Ikea hack. I wanted something very simple, and let's face it, cheap. I found the Ikea Vittsjo for $40. Here's what it looks like before I got to it.
All I did was spraypaint the bookshelf frame, but spray painting is not as easy as it sounds. here are the Materials I used: White Primer Spray Paint, Gold Spray Paint, and 180-250 Grit Sand Paper. Optional: mask


DIRECTIONS
  1. Find an open area like a backyard or garage. If you choose to do it in a garage like I did, make sure to keep the garage door open as spray paint fumes are not good for you!
  2. Keep in mind that there will be "overspray" which is spray paint residue that will get everywhere and looks like a light powder, so make sure there is nothing nearby that can get accidentally sprayed in the process. Make sure to put tarp, cardboard or some sort of material to protect your floor.
  3. Assemble the book shelf but do not put the glass shelves on. You can put the 2 top and bottom wood boards, or you can spray paint them separately.
  4. Wipe down the book shelf and make sure it's completely clean and free of dust or other dirt.
  5. Prime the bookshelf with white primer. When you spray paint, the key is to do a very light coat about 6-8" away in an up and down or right to left motion. 
  6. Let the first layer of primer dry (about 10 minutes) and then do another layer or 2 until the bookshelf is white. Again, make sure you don't spray too close or too heavy or else the paint will drip and you will see that texture.
  7. After the primer is dry, lightly sand the entire shelf t make sure the surface is smooth. Wipe down any sanded residue.
  8. Take your gold spray paint and spray one light layer. Again, make sure to stay about 6-8" away and keep it very light or else your paint will drip.
  9. Let the first layer dry and do another layer or 2 until you get the color you like. I did 3 layers. 

DRIP TIP
This was my first time spray painting a piece of furniture and I did mess up in a couple of places where I spray painted too close or too heavy where the paint dripped. In order to fix this, i took a stronger sandpaper (60-80 grit) and sanded off the paint where it dripped and had an uneven texture. Once it was smooth, I re-primed with white and then spray painted with gold. It blended in pretty well, so don't worry too much if you mess up and have to do this. 

Here's the final outcome styled with some of my favorite books, sculptures, and albums!