Tuesday, July 16, 2013

Wedding Coordinator Noob


My day job consists of Marketing, Event Coordinating, PR and Project Management, so I decided to put my organizational skills to use to start an event planning business.

Late last year, I was giving one of my good friends some ideas for wedding invitations and décor. I also ended up giving her a copy of a spreadsheet I created to help her budget and keep track of her expenses for the wedding. She ended up making me her Day of Wedding Coordinator, and that’s how this business became a reality. Here's my beautiful bride and groom:
Since this was a good friend of mine, I tried to also help her along the way, not just on the day of. I created the templates below for her to fill out to help the day go smoothly:
·         Timeline – Based on a traditional wedding I gave her time suggestions of events (makeup, ceremony, pictures, speeches, cake cutting, etc). I created a separate timeline for her wedding party and a vendor one so I knew when she wanted me to meet with vendors, provide payment, etc.
·         Checklist – list of things to bring and where they would be
·         List of Vendors & Contact Info
·         List of Bridal Party
·         I also asked her for : Any special requests/notes, diagram/picture of how she wanted décor set up

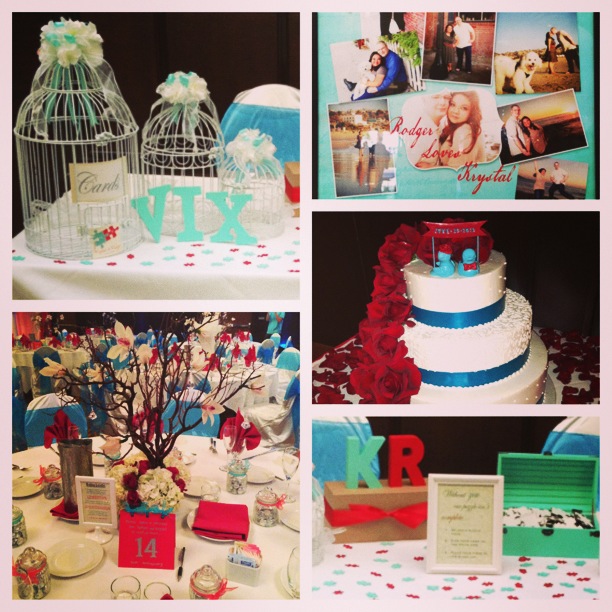
Here's a glimpse into her wedding and the decor I set up. It was a puzzle theme because they "found their missing piece"


On the day of the wedding, below were my main responsibilities:
·         Line-Up Wedding Party and give Flowers/Boutonnieres for Ceremony
·         Set up Décor: Welcome Table, Seating Chart, Guest Dinner Tables, Kids Activity Table, Dessert Table
·         Set up Food for Wedding Party
·         Meet with each vendor and call them to make sure they are on time.
·         Give meals and final payments and gratuities to each vendor
·         Work with Venue Coordinator to make sure everything in place, lighting is good, and be point of contact if any issues arise
·         Line-Up Wedding Party for Grand Entrance
·         Give cues to DJ for events and make sure everything running on time
·         Put Away Welcome Table Décor towards end of night
·         And most importantly… Make sure Bride & Groom are relaxed and have a great time!

For the most part I felt everything went smoothly. My bride was very happy with my work and so were the vendors that I worked with. Being on the other side of the wedding, I knew it was important to build a rapport with each vendor, so I tried to make sure that I took a few minutes to talk to each one and make sure they had everything they needed throughout the night and to use me as a resource if they had any questions or needed anything. When I had down time I brought drinks to my bride and groom and the wedding party too because I wanted to make sure they had a good time. It was also important to me to make sure the parents of the couple had everything they needed throughout the night, because this day is for them too. Many of the vendors asked me for my card, so I guess I need to create one now. I’m officially for hire for your big day!  

Here's are a few pics from the day of the wedding. Since I was also a guest at the wedding in addition to being the wedding coordinator, I got to get dressed up as well. If I wasn't a guest, I would most likely be wearing all black. I was going for a "Great Gatsby" look. You know I'm savvy, and my dress was a steal and treasure find from Lohemann's for about $50. The beading makes it look so expensive, I loved it! I  also included a shot with my cousin who is a good friend of the bride, but also the Hotel Venue Coordinator who helped me throughout the day as well.

Friday, July 5, 2013

Get Lifted - Upcycling Furniture Heights

First off, I apologize for not having blogged in awhile. I was super busy with work and coordinating my first wedding, which you'll hear about in my next post =)

Anyway, my last 2 pieces of furniture turned out to be too low to the ground so I needed to find a way to raise them up, but still keep it cohesive with the rest of my pieces, and stylish of course.

First off, I got this fabulous TV stand from www.vivedecor.com


I've seen this same Braxton Studio brand TV stand on sites like Amazon and Wayfair, but I found it for the best price on www.vivedecor.com for $250, shipped! Such a great deal, not even Ikea could give me something for this price at a comparable style. Anyway, I was stoked on the price, but of course with something that cheap, there's something bound to be wrong. When I got it, it was in a million pieces! With all cheap furniture, that's not really made of solid wood (mostly wood particle), you usually have to assemble it yourself and it doesn't come in one sturdy, ready-made piece, like the good old wood furniture pieces from back in the day. At first the assembly was going ok,, but when I went to drill in the very bottom piece, the holes weren't lining up and the directions didn't label some of the parts correctly. It took about 4 hours to put it together, and I ended up having to drill some of my own holes to make it fit. Thank goodness I'm a bit handy and knew that I could drill my own holes, because if you rely on directions, this would've been impossible! Anyway, I finally got it assembled and realized it was a bit too low for my  taste, especially since my sofa has 6" tapered legs which lifts it off the ground.


The solution? I found these mid-century style hairpin legs off of Furious Endeavors from Etsy . I worked with the shop owner Lou who was fabulous to work with! He made me a custom listing for 6" hairpin legs so they were lifted the same height as my sofa. I forgot I needed a leg for the very center of the TV stand to support the weight of the TV so it won't sag, so he is even making me a custom leg for that as well. His legs are the best price around and are already coated, while most other sellers sell these metal legs un-coated, which means they'll rust if you don't coat them yourselves.


The old legs were these cheap plastic silver squares that were about 1.5" high which I hated and were too low. I replaced them with the Furious Endeavors from Etsy metal hairpin legs. All you have to do is drill them with your own screws. I used 1.5" drywall screws and a basic drill. See the finished project below! I love how the legs made a super modern and plain TV stand into a mid-century style which i loved, and gave it the height I needed!


Now for my 2nd piece of furniture that needed some added height. You may remember my vanity below from a previous post. I ended up painting the frame grey, because I didn't like the contrast of brown and mint. I also ended up purchasing an Eames style Eiffel Chair like this at a furniture store for $40 because it was a floor model. That was such a steal in itself as this chair retails for about $100. The chair looked almost brand new, except for a few scuffs, all of which I removed with a Mr. Clean Eraser , which by the way is awesome for removing scuffs off walls, shoes, furniture, etc. Anyway, the chair barely fit under my vanity would scratch up against the lowest point, so I needed a way to raise the vanity.


My first thought was to get some circle wood pieces cut at Lowe's or Hope Depot to glue or drill to the bottom of the legs. Then it dawned on me! I remembered Michael's has a bunch of pre-made wood pieces so I took a trip there to see if I could find anything. I found these little wood pieces in the wood section for about $2.50 (with the Michael's 40% off coupons they always have). I knew the width and round, traditional style would go perfectly with the curved legs of my vintage vanity. I also got some E6000 glue, but you can use wood glue or drill them straight to the legs since these little wood pieces had a whole at the bottom and was hollow. I just worried since the legs were thin, that it might crack the wood, especially since it's a vintage piece, so I decided on the glue method for now.

I painted the wood pieces grey first to match the vanity, and then glued them on. Read the glue directions as this one requires 24 hours to dry. This type of glue is also a bit toxic, so make sure to have the windows open or apply in an open area.

I love how it turned out, and not my chair fits perfectly under, without touching the vanity. I feel like the addition goes perfectly with the existing style, and doesn't look like I added it. What do you think?


Even, Rambo approves!